Thermal Transfer Ribbon: A Complete Guide for Beginners
This guide is designed to give you thermal transfer ribbon details and clear any confusion about terms.
At Sunavin, we know how tough it can be to make the right choice when terms get mixed up.
That’s why we’ve written this guide to give you a quick rundown of our products, explain terms, and help you understand how to install and use thermal transfer ribbons effectively, with important tips.
It’s all about guiding you to make the best decisions for your thermal transfer printing needs.
So enjoy the read…
I. What Is The Thermal Transfer Ribbon?
Thermal transfer ribbon is a crucial consumable for barcode and label printers. It’s made by coating one side of a PET Base Film with meltable ink (wax, resin, or a mixture) and applying a Back Protection Layer on the other side.
A typical thermal transfer ribbon consists of several parts: Release Tab, Leader Tape, Ribbon, Trailer Tape, and Core.
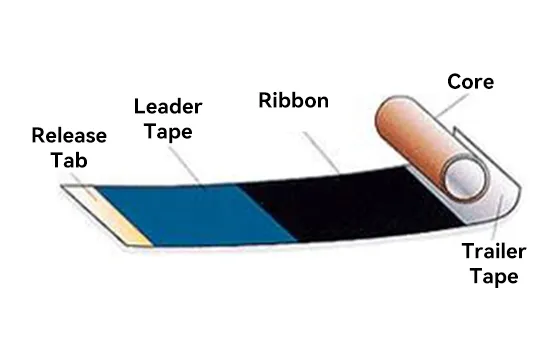
The Leader Tape, positioned at the front of the Ribbon, serves for product identification and protection.
The Ribbon, our go-to functional segment of the thermal transfer ribbon, usually comprises the Top Coating Layer, Ink Layer, Inner Coating Layer, PET Base Film, and Back Protection Layer:
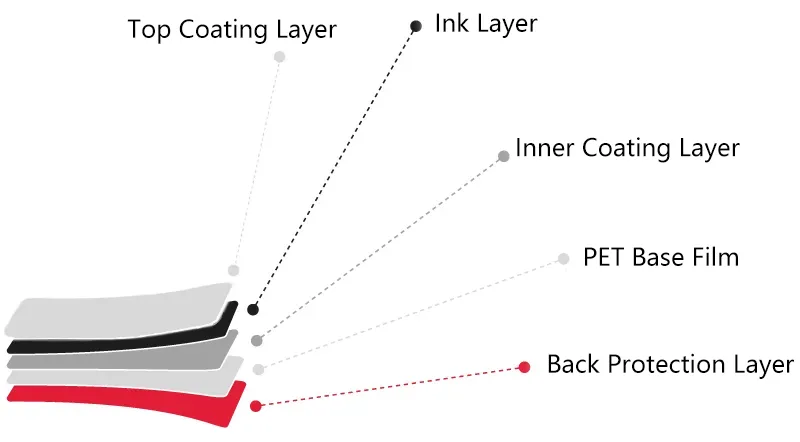
- The top Coating Layer enhances ink adhesion on labels, boosting resistance to environmental factors.
- Ink Layer determines the ribbon’s usage characteristics, such as chemical resistance and friction prevention.
- The inner Coating Layer ensures a smooth printing surface and consistent ink release from the base.
- PET Base Film is the carrier for all layers, which is crucial for thermal conductivity.
- The Back Protection Layer reduces wear on the thermal printhead, minimizes static electricity generation, and enhances heat transfer.
Trailer Tape, located at the end of the thermal transfer ribbon (though some may not have it), warns the barcode printer, indicating the ribbon is running out.
The Core of a thermal transfer ribbon commonly comes in paper and plastic. The primary requirement is that it must not deform and should remain stationary during printing.
Read More: Unveiling the Components of Thermal Transfer Ribbons
II. How do Thermal Transfer Ribbons Work?
The working principle of thermal transfer ribbons primarily relies on the heat generated by the thermal print head to transfer the ink layer from the ribbon onto the printing medium (such as label paper or synthetic materials), thus achieving the printing of images and text.
The working principle involves several key steps:
- Base Heating: When a thermal transfer ribbon passes through a thermal transfer printer, it undergoes a base heating phase. During this phase, the ribbon is positioned under the print head, which is equipped with a series of heating elements.
- Localized Heating: The heating elements on the print head generate high temperatures by controlling the electric current and locally heating the color layers of the ribbon. Depending on the printed content, specific areas of the ribbon are heated, causing the ink in the color layer to melt into a liquid state.
- Ink Transfer: Once the ink is heated and melted, it adheres to the printing media below the print head, typically paper or labels. Ink transfer is achieved through a process of heat and pressure, ensuring that the ink adheres securely to the surface of the printing media.
- Curing and Cooling: The ink transferred to the printing media solidifies upon contact and undergoes cooling, forming a durable printed image. The protective layer during this process shields the ink from external influences, enhancing the durability of the print.
The working principle of thermal transfer ribbons ensures clarity, durability, and stability in printing. It finds extensive applications, especially in label printing, barcode printing, and document printing, playing a crucial role in various fields.
III. What are the different types of thermal transfer ribbons?
Many people, especially beginners, often find themselves confused by the different names for thermal transfer ribbons when they first start using them.
It’s understandable, given that thermal transfer technology has branched out significantly over the years. Different types of thermal transfer ribbons have been developed to meet various printing needs.
Let’s break them down systematically.
Classified by the main material of the ink layer
1. Wax Ribbon:
Wax ribbon is one of the most common thermal transfer ribbon types, typically used for label printing and general product identification.
The ink layer primarily comprises wax and carbon powder, making it economical, easy to use, and suitable for various label materials.
However, due to limited durability and waterproofing, it may not be suitable for certain professional applications.
2. Resin Ribbon:
The ink layer primarily comprises resin and carbon powder, offering the highest durability and resistance to abrasion, heat, and corrosion. Some formulations withstand steam pressure, while others endure washing or dry cleaning.
It’s highly suitable for applications requiring high print quality and durability, such as chemical and healthcare labels.
However, due to its higher cost, it’s typically only used in specific industries with strict requirements.
3. Wax Resin Ribbon:
The ink layer is primarily composed of wax, resin, and carbon powder, combining the characteristics of both wax and resin, providing excellent print quality and durability.
This type of thermal transfer ribbon is suitable for applications requiring a longer lifespan and higher print quality, such as manufacturing and logistics labels, balancing price, and print performance.
How do we evaluate the merits of the above thermal transfer ribbons?
Unfortunately, although the above thermal transfer ribbons have different compositions and characteristics, it’s difficult to determine which is better simply.
Because the evaluation criteria are multifaceted, including medium adaptability, sensitivity, print quality, resistance tests, application scenarios, price, etc.
Remember, there’s no best thermal transfer ribbon, only the one that best fits your needs.
Read More: Choosing the Right Thermal Transfer Ribbon: Wax Ribbon, Resin Ribbon, or Wax Resin Ribbon?
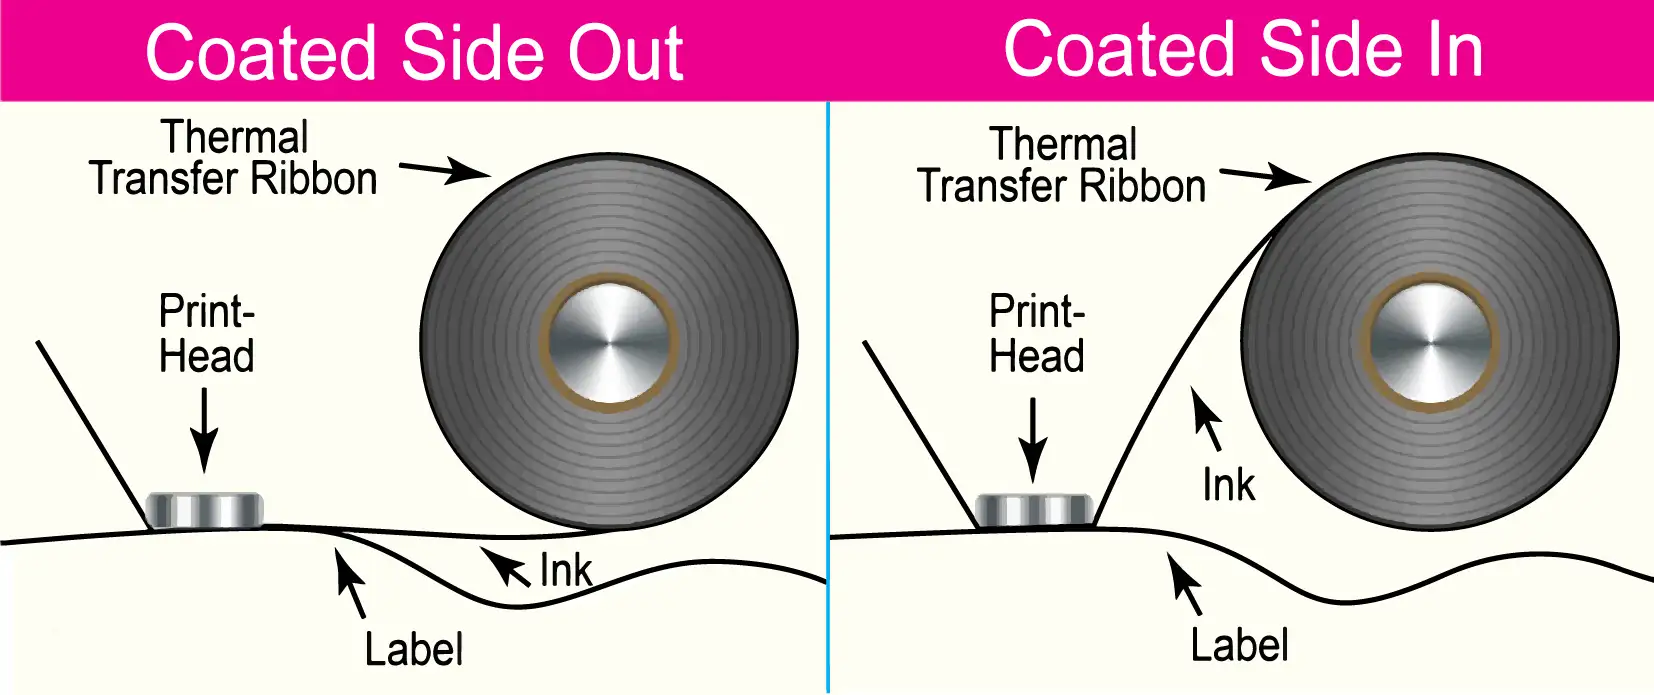
Classified by Coated Side
When selecting thermal transfer ribbons, you’ll notice two options:
Coated side out (CSO) and coated side in (CSI).
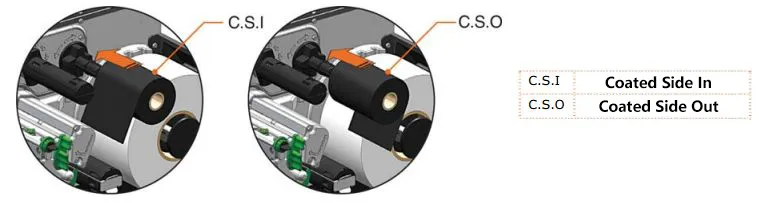
These refer to the position of the ink coating on the ribbon, directly impacting how it wraps and feeds into the label printer.
Choosing the wrong coated side can lead to consequences like printing on the ribbon but not on the labels themselves. Unfortunately, many barcode printers only support one of these options.
So, before purchasing, it’s essential to know which type of thermal transfer ribbon (CSO/CSI) matches your printer.
If you’re unsure, feel free to reach out to us. Our experienced experts can provide you with the answers you need.
Classified by Printer Printhead Usage
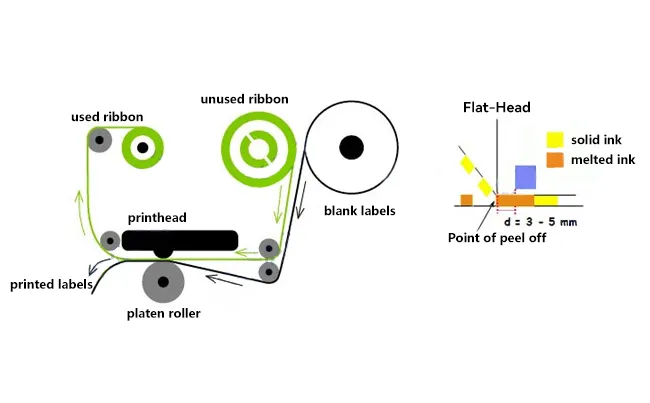
1. Flat-Head Ribbon:
In flat-head ribbon setups, the thermal transfer ribbon lies flat between the thermal printhead and the labels, staying parallel to the label surface.
During printing, the thermal printhead applies direct heat and pressure between the ribbon and labels, causing the ink layer to transfer onto the labels.
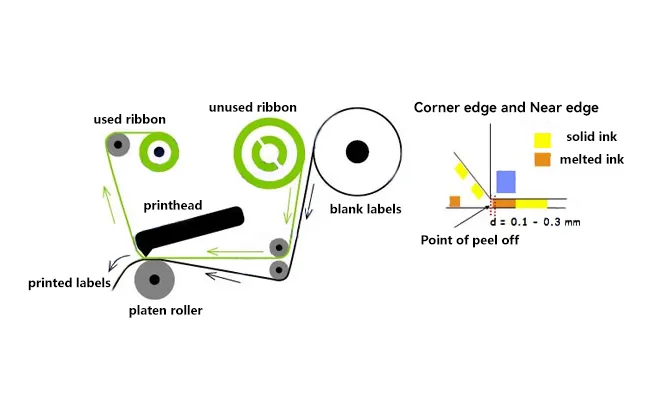
2. Near-Edge Ribbon:
In near-edge ribbon setups, one side of the thermal transfer ribbon is positioned between the thermal printhead and labels, while the other side contacts the label surface.
The thermal printhead applies heat and pressure during printing, transferring the ink layer from one side of the ribbon onto the labels.
This arrangement is typically used in specific printers and scenarios, such as those requiring higher printing speeds or where print quality requirements are less stringent.
DNP has produced an excellent educational video on this topic.
IV. What Are The Applications Of Thermal Transfer Ribbons?

We’ve compiled some primary application areas along with the most commonly used types of thermal transfer ribbons for your reference:
- Industrial Manufacturing: Resin Ribbon is used for assembly and maintenance in industrial equipment, particularly for sealing, bonding, and labeling.
- Electrical Industry: Resin Ribbon is utilized in circuit board manufacturing and maintenance and in marking and packaging electrical products.
- Electronics Industry: Resin Ribbon is employed in the assembly, packaging, and maintenance of electronic products, such as semiconductor packaging and labeling electronic components.
- Logistics and Transportation: Wax Resin Ribbon is used for marking goods, packaging, sealing boxes, and for tracking and identification in logistics management.
- Food Industry: Wax Ribbon is essential for food packaging, especially in fast food and frozen food packaging, providing sealing and freshness preservation.
- Medical Devices: Resin Ribbon ensures product quality and safety by being used for packaging, labeling, and sealing medical devices.
- Chemical Industry: Resin Ribbon is crucial for the packaging, labeling, and sealing of chemical products, as well as the maintenance of chemical equipment.
- Household Items: Wax Ribbon is commonly used for labeling, packaging, and sealing household items such as detergents and laundry powder.
- Retail Industry: Wax Ribbon is ideal for product labeling, price tags, packaging, and tracking and identification in sales management.
- Horticulture and Floriculture: Wax Ribbon labels plant names and types and provides care instructions for management and sales purposes.
- Automotive Industry: Resin Ribbon is utilized for marking, packaging, and assembly of automotive components, as well as for labeling and tagging in automotive repairs.
- Aerospace: Resin Ribbon is employed for marking, packaging, and maintaining aerospace components, ensuring product durability and reliability.
- Footwear and Bags: Resin Ribbon is used for labeling, packaging, and assembly of shoes and bags.
- Clothing Industry: Resin Ribbon is essential for clothing labels, price tags, packaging, and for labeling and packaging in garment production.
- Telecommunications: Resin Ribbon is used for marking, packaging, and maintaining electronic communication products to ensure product quality and reliability.
Of course, quality assessment standards vary from person to person, as do thermal transfer ribbons, labels, and barcodes.
Are you not confident about the thermal transfer ribbon you will purchase? No worries. Sunavin offers two free rolls of thermal transfer ribbon samples for testing.
Practice makes perfect.
V. How Are Thermal Transfer Ribbons Produced?
Sunavin has meticulously designed our production process to guarantee that every roll of thermal transfer ribbon meets the highest standards of excellence.
STEP 1. Base Material Preparation:
The process begins with the preparation of the base materials.
The choice of substrate should consider its heat resistance, smoothness, and chemical stability.
This includes PET film (Polyethylene Terephthalate) and a mixture of resin, wax, carbon black, and various additives.
These materials are essential to ensure the ribbons’ quality, durability, and performance.
STEP 2. Coating:
Next, preparing the thermal transfer coating is essential.
The coating formulation process requires thoroughly mixing various components to form a stable solution.
The coating solution is then even applied to the substrate surface.
Coating can be done using methods like roller coating, spraying, or other suitable techniques.
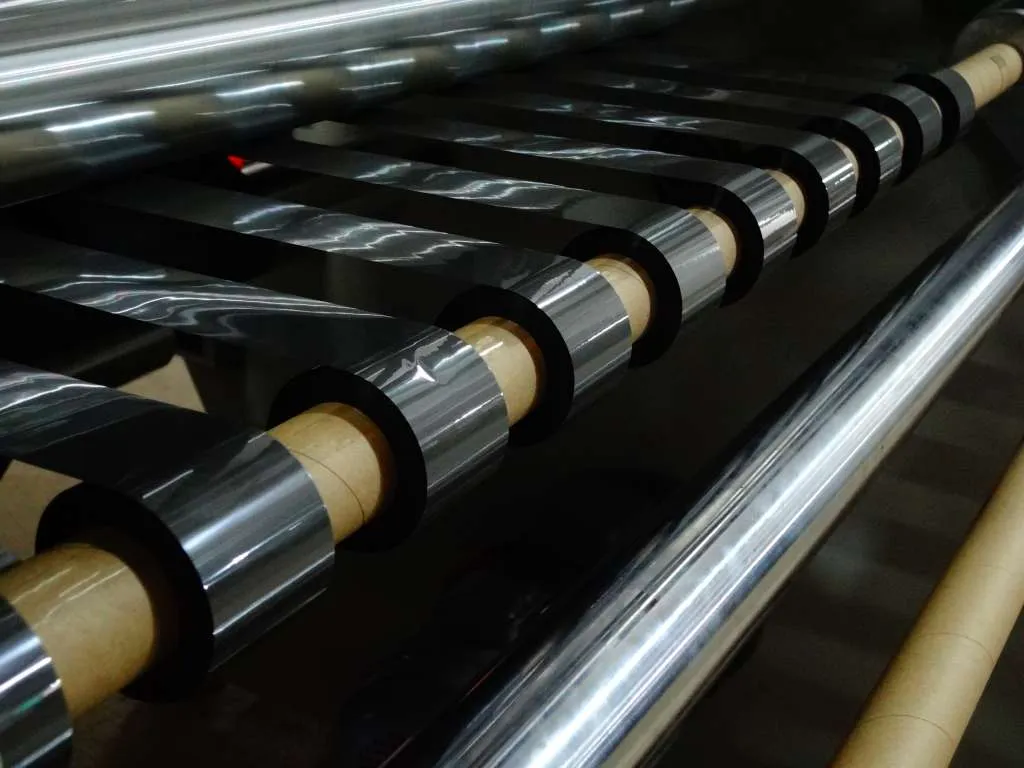
Sunavin utilizes state-of-the-art automatic coating technology. The coating solution is uniformly coated onto the PET film. This advanced technology ensures consistent thickness and quality across the entire length of the ribbon.
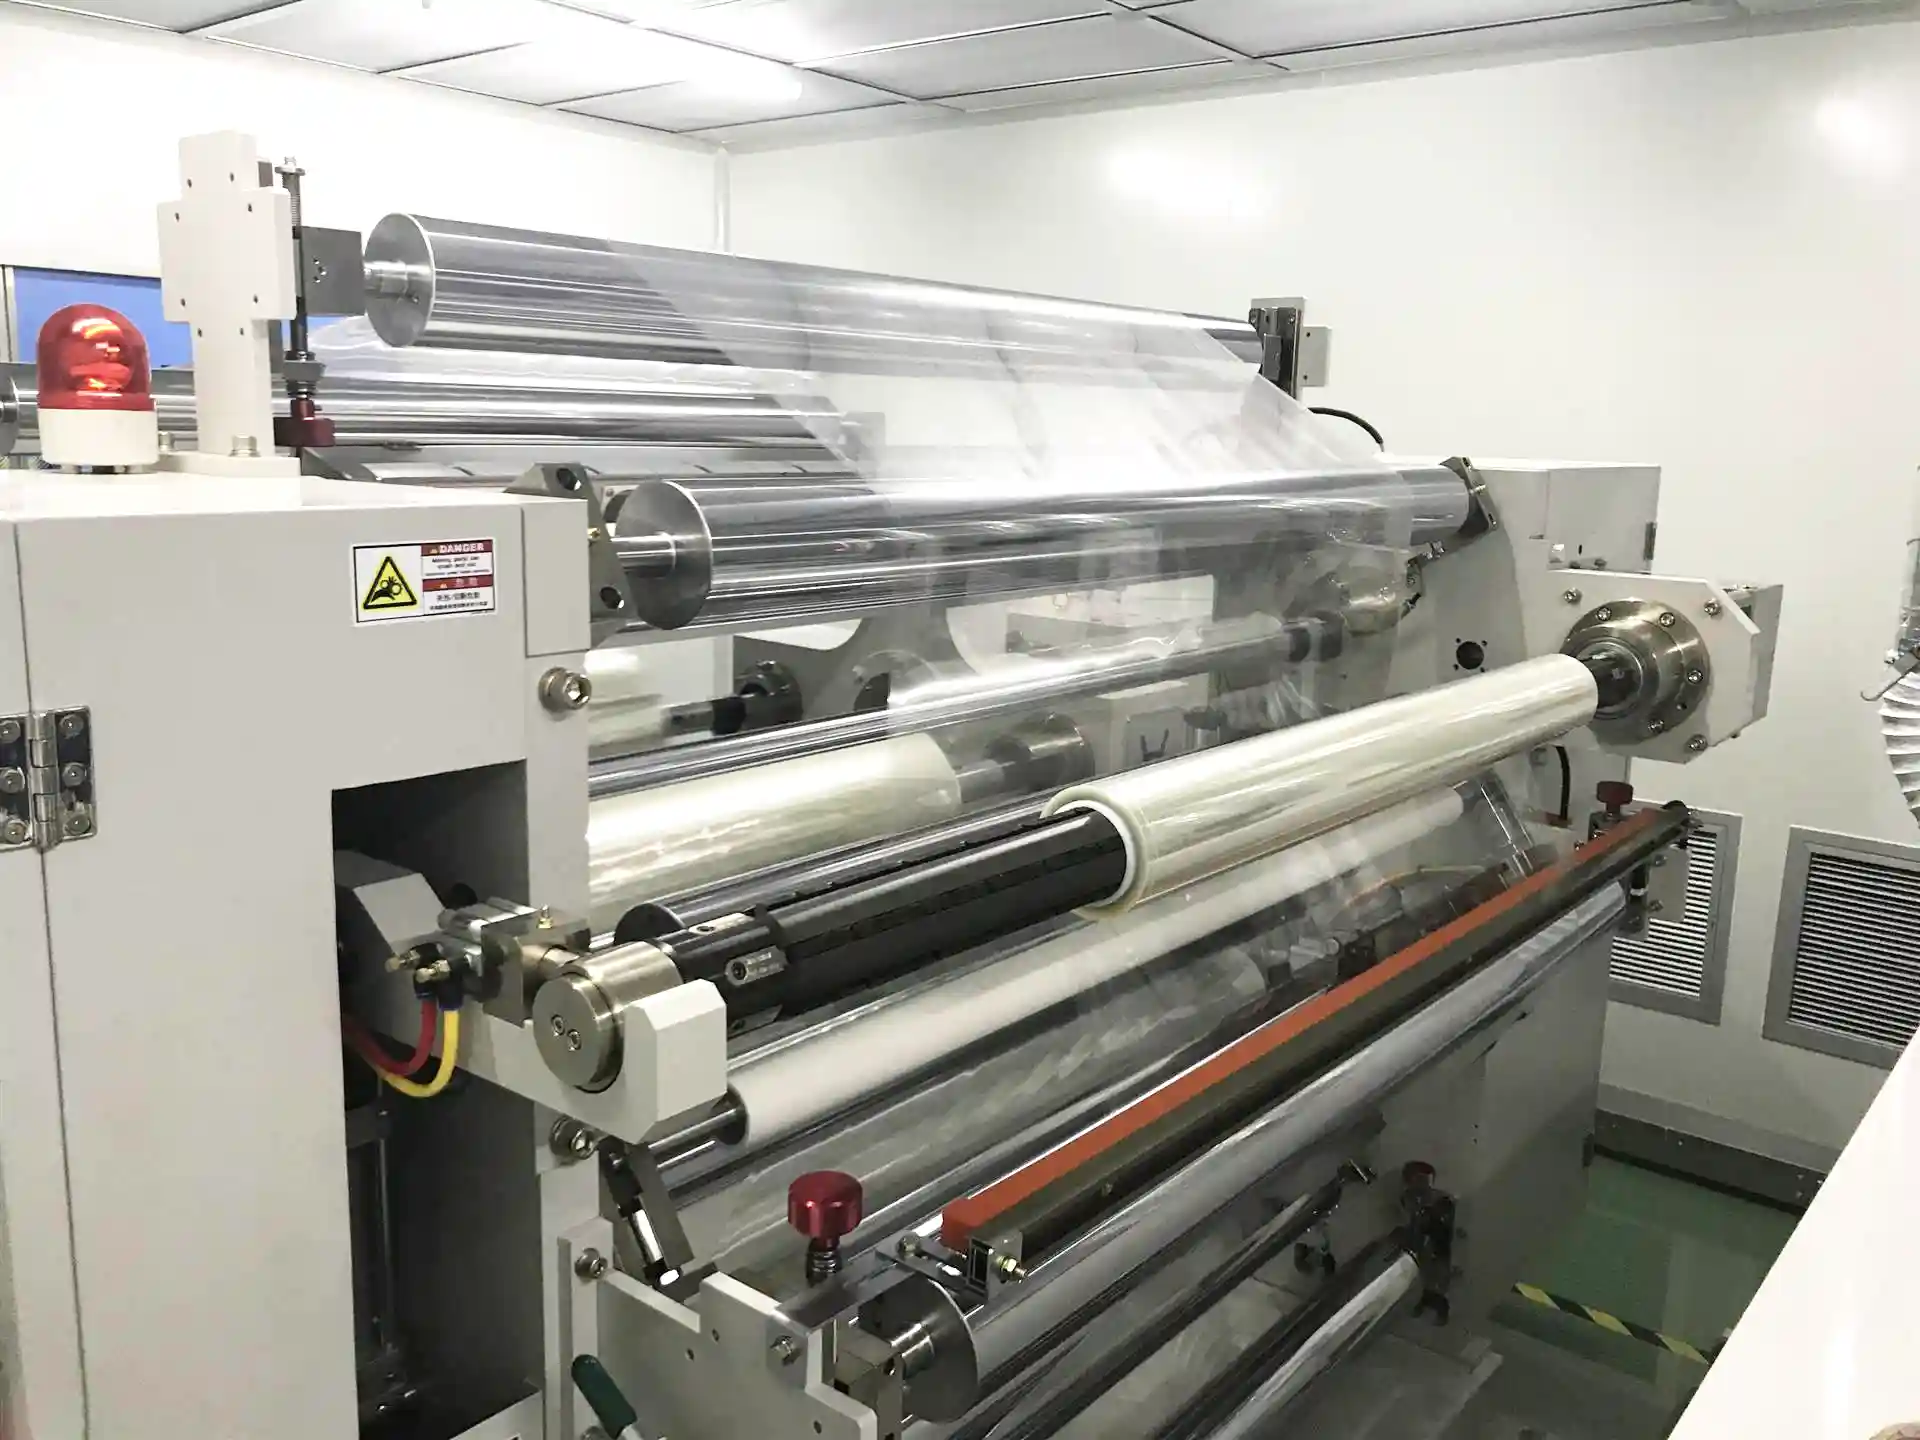
Automatic Coating Machine
We chose 4.5um film as the substrate and employed advanced roller coating technology to apply key layers evenly onto the PET Base Film.
These layers include PET Base Film, Inner Coating Layer, Ink Layer, Top Coating Layer, and Back Protection Layer. Each layer is carefully designed to enhance the performance and printing quality of the final product.
Feeling familiar? You’re right; these were mentioned earlier. Now, let’s delve into the role of each layer:
| PET Base Film | The foundation of the thermal transfer ribbon is PET Base Film, a transparent and elastic material capable of withstanding stress under high temperature and pressure. The selection of this layer directly impacts the stability and durability of the thermal transfer ribbon. |
| Inner Coating Layer | Located between the Ink Layer and PET Base Film, the Inner Coating Layer interacts with the thermal printhead’s heat energy, allowing the pigments in the Ink Layer to release appropriately and transfer to the printing surface. The Inner Coating Layer provides protection and stability to ensure print quality. |
| Ink Layer | The core of the thermal transfer ribbon is the Ink Layer, containing the actual printing pigments. The material and quality of this layer directly affect the clarity and stability of printing. Common materials for the Ink Layer include resin and wax, which melt quickly at high temperatures and adhere to the printing material. |
| Top Coating Layer | The Top Coating Layer is the surface layer of the thermal transfer ribbon, responsible for receiving the heat energy from the thermal printhead and transferring it to the printing surface. This layer typically consists of materials resistant to high temperatures and abrasion to ensure clear and durable printing effects. |
| Back Protection Layer | At the bottom of the ribbon, the Back Protection Layer is designed to protect the PET Base Film from damage during use. This layer usually possesses excellent wear resistance and corrosion resistance, ensuring a longer lifespan for the thermal transfer ribbon. |
STEP 3. Cooling & Drying:
After applying the coating, the film must undergo a cooling and drying process to form a stable structure.
The coated film passes through a series of drying ovens where the solvents in the coating evaporate, leaving a solid layer of thermal transfer material on the film. The temperature and speed of the drying process are carefully controlled to avoid any defects, such as bubbles or uneven surfaces.
This step is crucial to stabilize the coating and ensure it adheres properly to the PET film without any imperfections.
Once dried, the film is cooled to room temperature to stabilize the coating before moving to the next stage.
STEP 4. Slitting & Rewinding:
Now cooled and dried, the coated film is subjected to slitting and rewinding.
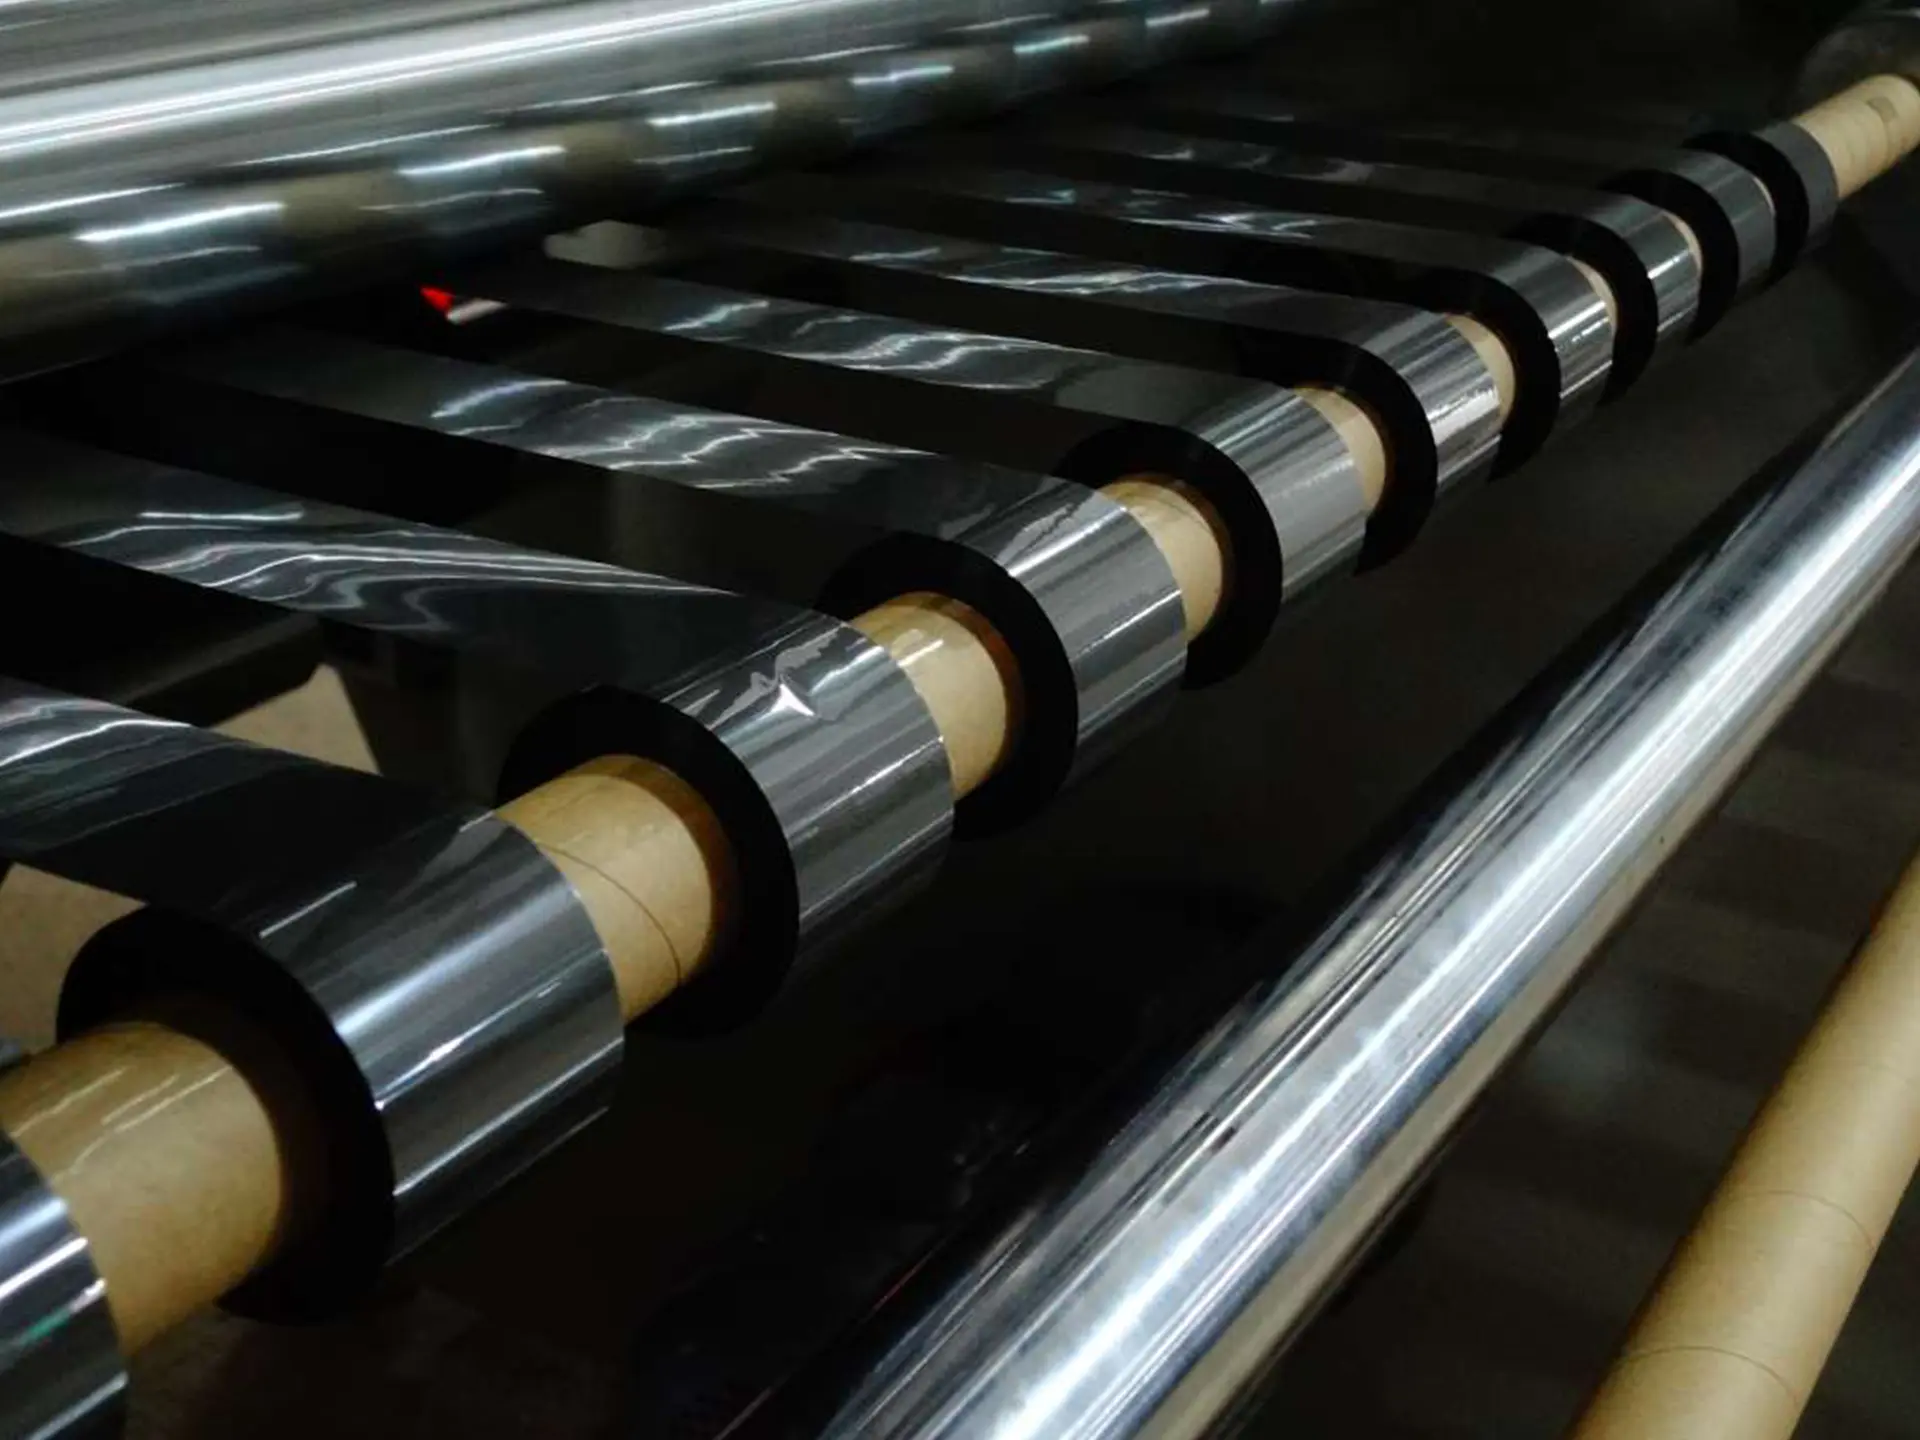
During this step, the wide master rolls of coated film are cut into narrower rolls according to the required ribbon widths.
This slitting process is precise and tailored to meet various customer requirements for different ribbon sizes. After slitting, the narrower rolls are rewound onto smaller cores.
This step requires meticulous attention to maintain the tension and alignment of the film to prevent any wrinkles or inconsistencies in the final product.
Read More: Exploring Thermal Transfer Ribbon Slitting Techniques
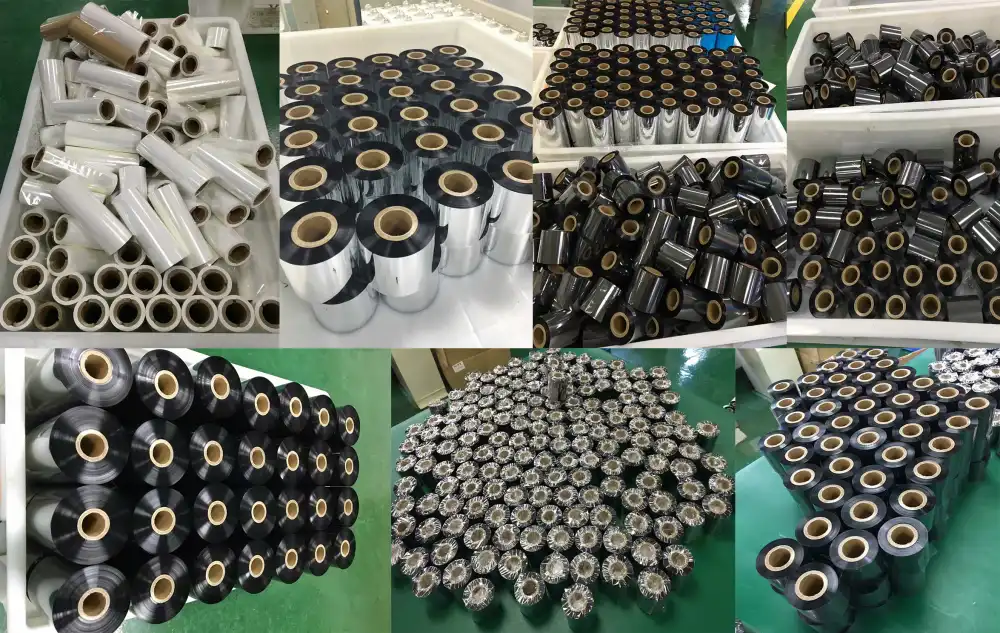
STEP 5. Finished Rolls:
The slitted and rewound ribbons are now in the form of finished rolls. Each roll is inspected for quality assurance to meet the specified standards.
This includes checking for any visual defects, measuring the ribbon length and width, and testing the print quality. Any rolls that do not meet the quality criteria are rejected or reprocessed. The finished rolls are then labeled with product information and batch numbers for traceability.
STEP 6. Packaging & Boxing:
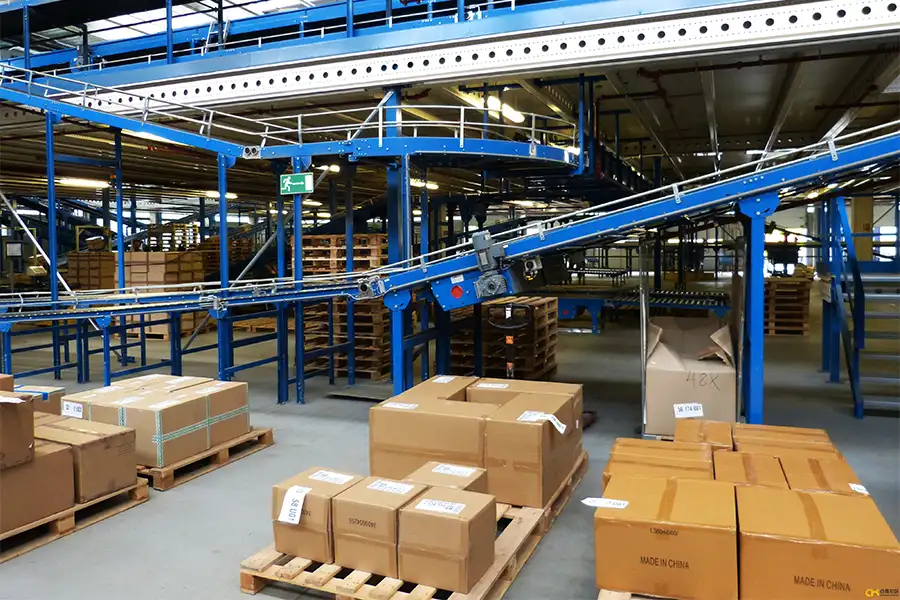
The final step is packaging. The finished thermal transfer ribbons are carefully packaged to protect them during transportation and storage. They are then boxed and prepared for shipment to customers.
Next, let’s talk about mineral oil.
Mineral oil (MOH) is a hydrocarbon mixture derived from petroleum, mainly consisting of saturated hydrocarbon mineral oil (MOSH) and aromatic hydrocarbon mineral oil (MOAH). MOH, especially MOAH, has potential carcinogenic and mutagenic properties and can pose health risks to humans through various pathways such as environmental pollution, lubricants in food processing machinery, production aids, food additives, and food contact materials, attracting attention from various countries.
Printed paper products are considered to have a high risk of mineral oil exposure to the population because mineral oil is a typical raw material for almost all types of offset printing inks (solvents for the resin used as adhesives). Therefore, several countries have begun to restrict and monitor the mineral oil content in paper products.
In short, mineral oil is a harmful substance that used to be one of the main components in manufacturing thermal transfer ribbons.
Now? Sunavin says “No!” to mineral oil.
Our latest manufacturing process utilizes green, non-polluting synthetic oils as substitutes for mineral oil, primarily including poly-alpha olefins or liquid paraffin. These alternatives may offer similar performance and functionality while potentially being more environmentally friendly and health-safe.
Sunavin is leading the way in green and sustainable development.
VI. How to Choose the Right Thermal Transfer Ribbon?
Lots of beginners and even some Distributors often buy thermal transfer ribbons without thinking too much, and then they realize they’ve got low-quality ones causing all sorts of problems with their prints.
Here’s why it happens:
- Being all about the price and forgetting quality: Some folks only care about how cheap it is, forgetting that low-priced thermal transfer ribbons might mess up their prints, not last long, or not even work with their printer.
- Ignoring if it’s the right fit: Different barcode printers need different types of thermal transfer ribbons. You gotta make sure the one you pick works with your printer and does the job right.
- Not knowing what you’re buying: Some people aren’t familiar with thermal transfer ribbons, so they pick the wrong ones or misunderstand what they’re getting, messing up their prints.
- Forgetting about the seller’s rep and service: Choosing a good seller is important. Ignoring their reputation and what they offer after you buy might mean you’re stuck with problems later.
- Insufficient consideration of storage: How you store thermal transfer ribbons, like the temperature and humidity, really affects how well they work. Ignoring this could mean problems down the line.
- Without shopping around: Before buying, you gotta check out different brands and models of thermal transfer ribbons to ensure you’re getting the best one.
- Ignoring eco-friendly options: Some people who care about the environment might not consider how eco-friendly their thermal transfer ribbons are. Ultimately, they might choose thermal transfer ribbons that are not environmentally friendly and may even pose a risk to human health.
- Blindly following trends: Some buyers jump on the bandwagon with popular brands or models without thinking about what they need, causing problems later.
Common Quality Issues with Thermal Transfer Ribbons:
- Holes or bubbles in the ribbon: Uneven ink coating results in incomplete prints.
- Ribbon wrinkling: Improper tension control during cutting can lead to unprinted areas due to temperature differences between layers.
- Blank spots in the ribbon: Poorly processed PET film may cause areas to lack ink.
- Incorrect ribbon core size: A core that’s too big or too small can prevent proper fitting in your printer and cause tension issues.
- Ribbons sticking together: High temperatures during transport can cause ribbons to adhere to each other.
- Misaligned ribbon core tracking: This can lead to ribbon breaks and incomplete printing along the edges.
- Insufficient ribbon length: Short ribbons can disrupt printing operations.
- Improper ribbon winding tension: Ribbons wound too tightly or loosely during processing can cause printer problems.
Don’t settle for subpar products!
Sunavin offers high-quality, compatible thermal transfer ribbons with loads of experience. Our ribbons are top-notch and work with a wide range of printers, making them the go-to choice for folks around the globe. We guarantee you won’t encounter any common quality issues mentioned.
What should you think about when buying thermal transfer ribbons?
- What printer are you using?
Ensure your printer’s print width is wider than the ribbon and at least as wide as your label paper. - What are you printing on?
Rough surfaces work best with wax ribbon or wax resin ribbon, while smooth surfaces are better suited for resin ribbon. - How long do you need your prints to last?
Wax ribbon < wax resin ribbon < resin ribbon in terms of durability. - How much can you spend?
Wax ribbon < wax resin ribbon < resin ribbon in terms of cost. - What kind of wear and tear will your labels face?
Wax ribbon < wax resin ribbon < resin ribbon regarding resistance to scratching, smudging, corrosion, and heat. - How fast do you need to print?
If you need fast prints, go for high-sensitivity thermal transfer ribbons like resin ribbon or wax resin ribbon. They’ll give you clear prints with less energy, meaning you’ll get good-quality prints even at lower printer settings, and they’ll help your printheads and ribbons last longer.
If you’re still unsure about what to pick, contact our experts, and we’ll help you find the perfect product.
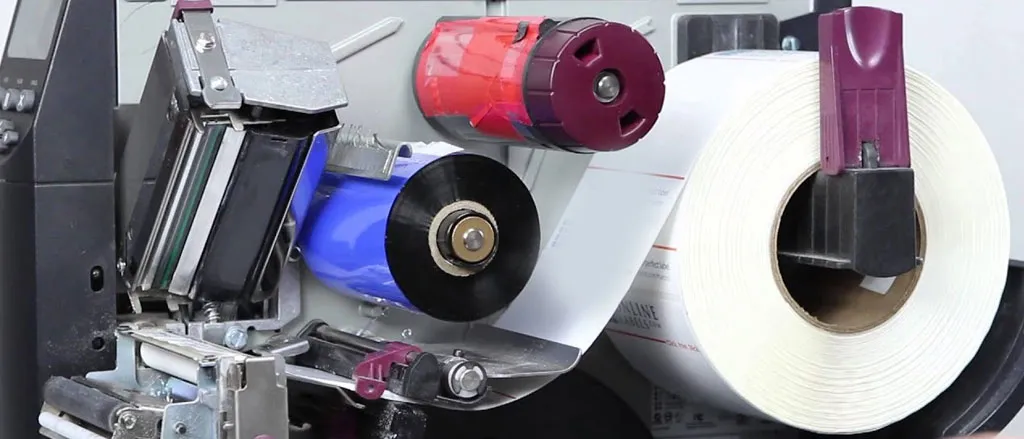
VII. How To Install And Use Thermal Transfer Ribbons?
After buying it, many people get stuck on how to put on a thermal transfer ribbon.
Don’t worry, here’s a simple guide:
- Preparation: Begin by ensuring that the printer is turned off and allow it to cool down. Also, gather the new thermal transfer ribbon and a cleaning cloth.
- Open the Printer: Open the printer cover to easily access the printhead and thermal transfer ribbon area.
- Remove the Old Thermal Transfer Ribbon: Locate the thermal transfer ribbon beneath the print head. Typically, it is positioned directly under the printhead and secured to the printer with a small clip or fastening mechanism. Carefully open this clip or mechanism and remove the old ribbon.
- Clean the Print Head Area: Before installing the new ribbon, gently wipe the print head and surrounding area with the cleaning cloth to ensure there is no dust or debris.
- Install the New Thermal Transfer Ribbon: Take out the new thermal transfer ribbon, ensuring it is compatible with your printer in size and type. Place the new ribbon correctly beneath the printhead, ensuring it makes good contact with it.
- Re-fasten the Mechanism: Secure the ribbon onto the printer. This may involve gently pressing down or closing the clip or a fastening mechanism to ensure the ribbon is securely in place.
- Close the Printer Cover: Once the ribbon is properly installed, close the printer cover securely.
- Test Printing: Restart the printer and perform some test prints to ensure the ribbon is installed correctly and the print quality is satisfactory.
- Adjust Settings (if necessary): Depending on your printer, you may need to adjust printer settings to accommodate the newly installed ribbon. This might involve adjusting print quality, print speed, and other parameters.
If you’re still confused, we’ve got some videos for different printer types:
For industrial printers like the Zebra ZT410:
For desktop printers like the TSC TTP-244 PRO:
If your printer’s not in the videos and you’re still lost:
1. Call the printer company:
TSC: [Link to TSC customer service]
Zebra: [Link to Zebra customer service]
2. Talk to Sunavin’s experts. We’re here to help!
VIII. Key Factors For Effective Maintenance
Paying attention to details and pursuing top quality is crucial to achieving the best thermal transfer printing effect.
Sunavin recommends these expert tips on how to store and use thermal transfer ribbon and what factors may affect its performance.
Usage Environment: Maintain humidity between 45% and 85% and temperature between 5°C and 35°C.
Transport Environment: Humidity between 20% and 85%, and temperature between -5°C and 45°C. Avoid prolonged transportation times.
Storage Environment: Store the thermal transfer ribbon in a dry and cool place, avoiding significant temperature changes. The optimal storage conditions are humidity between 20% and 85% and temperature between -5°C and 40°C, with a storage time not exceeding one year.
Note:
1. Exposing the thermal transfer ribbon directly to sunlight and humid environments can damage it. If your location is very hot and humid or cold and dry, store the thermal transfer ribbon in a room with air conditioning. This helps prevent damage to the thermal transfer ribbon coating.
2. If transported by long-distance sea freight, the thermal transfer ribbon may get damp. Place it in an air-conditioned room for 3-7 days to ensure it’s in optimal printing condition.
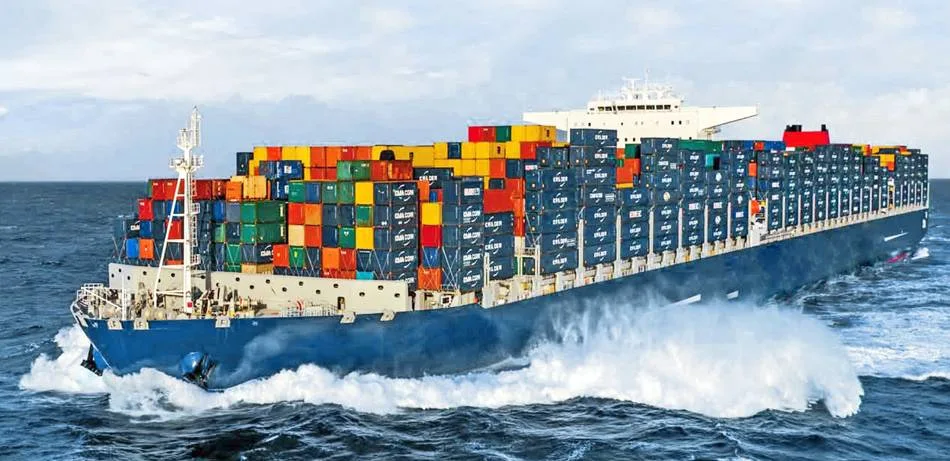
sea-freight
IX. Factors Impacting Thermal Transfer Printing Results
Several factors can impact printing quality, including the quality of the barcode printer, the type and compatibility of the thermal transfer ribbon used, the condition and compatibility of the thermal printhead, pressure and temperature settings of the printer, and the temperature, humidity, and cleanliness of the printing environment.
To achieve optimal printing results, keep the following points in mind:
Key to Quality Printing: Choose Your Barcode Printer
Select an accurate and reliable barcode printer.
A suitable barcode printer can produce perfect colors and clear images without frequent breakdowns.
Opting for high-quality barcode printers also means reducing the waste of thermal transfer ribbons and enhancing production efficiency.
Picking a reputable brand means choosing better support.
This ensures quick assistance and maintenance for consistent, high-quality printing.
Brands like Zebra and TSC are widely respected in the barcode printer industry.
Thermal Transfer Ribbon: The Core of Excellent Label Printing
High-quality thermal transfer ribbon results in clear and bright printing.
Using cheap thermal transfer ribbons may cause blurry prints, strange colors, or uneven printing.
Why collaborate with the right suppliers?
Stable thermal transfer ribbon quality is crucial, so partner with suppliers equipped with the latest production facilities.
They should conduct extensive quality checks to ensure their products meet standards. A 1-1.5% defect rate is typically acceptable in the thermal transfer ribbon field.
Sunavin has full confidence in the quality of our products, with strict quality inspection departments in our factory.
Our defect rate is less than 1% – yes, we guarantee it.
Rest assured, defective and substandard products won’t leave Sunavin’s factory gates.
Condition and Compatibility of Thermal Printhead:
Why is the condition of the thermal printhead so crucial?
The thermal printhead is precise and delicate as the core component of barcode printers.
Regularly inspect and clean the thermal printhead to prevent dust and carbon accumulation, ensuring its normal operation.
Also, ensure the selected thermal transfer ribbon is compatible with the thermal printhead and use it according to the manufacturer’s recommendations.
Don’t hesitate to contact us if you can’t find the thermal printhead you need on the market.
Sunavin will always provide you with a satisfactory solution.
Pressure and Temperature Settings
The pressure and temperature of barcode printer settings are like the craftsman’s working environment; too high or too low can cause problems.
Excessive pressure can cause premature wear of the print head, while too low can result in uneven ink spraying; excessively high temperature may damage the printhead, while excessively low temperature affects ink flow.
Adjust the printer’s pressure and temperature settings according to the requirements of the selected ribbon.
Ensure the settings meet the ribbon and printing media requirements to avoid excessive or insufficient pressure and temperature during printing.
Temperature, Humidity, and Cleanliness of the Printing Environment:
Maintain cleanliness and dryness in the printing environment to avoid the influence of dust and moisture on printing results.
Regularly clean the surroundings of the printer and ensure good ventilation in the printing area.
X. Common Issues and Solutions for Thermal Transfer Ribbons
1. Why are my printed labels coming out light-coloured, blurry, and with white spots?
Analysis of Issues
- The printing temperature might not be right, possibly too low.
- The printer head pressure is too low.
- The ribbon itself is malfunctioning, exhibiting issues like exposed spots and lines.
- The ribbon doesn’t match the label; for instance, using resin ribbon for printing on coated or rough paper.
- The ribbon type doesn’t correspond to the printer type.
- The printer head or platen roller is dirty.
- Uneven printing materials are present on the label during printing.
Troubleshooting and Solutions
- Increase the printing temperature. Attempt adjusting the “Density” or “Darkness” settings in the barcode editing software or printer properties interface.
- Adjust the printer’s pressure appropriately. Note: Industrial machines feature specialized pressure adjustment mechanisms. Some desktop models include such features, while others do not.
- Verify if the ribbon matches the label; for example, use a resin ribbon to print on coated or rough paper.
- Check if the ribbon is compatible with the label, such as using resin ribbon for printing on coated or rough paper.
- Confirm whether a near-edge ribbon is used on a flat-head printer or a flat-head ribbon is used on a near-edge machine printer.
- Clean the printer head and platen roller using alcohol wipes.
- Replace with blank labels to resolve ribbon-related issues.
2. Why do the printed labels show one side darker and the other lighter?
Analysis of Issues
- The ribbon coating exhibits irregularities when used in back coating or ink application.
- Accumulated dirt on the printer head or platen roller is causing issues.
- Inconsistent printer pressure is evident.
- There is noticeable wear on one side of the platen roller.
Troubleshooting and Solutions
- Examine for noticeable disparities in the ribbon coating.
- Utilize alcohol-soaked cotton to clean the printer head and platen roller thoroughly.
- Adjust the pressure on both sides of the printer accordingly. Note: Industrial printers typically feature specialized pressure adjustment mechanisms. Some desktop printers may include such features, while others may not.
- Inspect the platen roller for wear and tear. If significant wear is detected, replacement with a new roller is the recommended course of action.
3. What’s causing the printed labels to have white lines or diagonal streaks?
Analysis of Issues
- The ribbon appears wrinkled.
- The printer head is dirty.
- The printer head might have broken pins (potentially false indication).
- Uneven pressure on the printer head results in the ribbon tilting and wrinkling during printing.
- The printer baffle is loose.
- The printer transition roller is loose, causing the ribbon to wrinkle before reaching the printer head.
- The printing temperature is too high, leading to scorching of the carrier.
Troubleshooting and Solutions
- Inspect the ribbon for obvious wrinkles and test with a different roll to verify if the issue persists.
- Clean the printer head using an alcohol-soaked cotton ball.
- Initially, clean the area of the printer head with exposed lines using alcohol-soaked cotton. If exposed lines persist after cleaning, it confirms broken pins on the printer head, necessitating replacement.
- Adjust the pressure on the printer head to assess if it resolves the problem.
- Check if the metal baffle where the ribbon exits the printer head is loose and adjust it securely.
- Verify if the metal transition roller, through which the ribbon enters the printer head, is loose and tighten it as necessary.
- Reduce the printing temperature to evaluate if it alleviates the issue.
4. Any idea why the printed labels are missing in a pattern?
Analysis of Issues
- The ribbon consistently lacks coating in certain areas.
- The printer’s rubber roller is partially damaged.
- Regular oil stains and adhesive spills are present on the label surface.
Troubleshooting and Solutions
- Inspect the ribbon under light to detect consistent areas lacking coating.
- Examine the printer’s rubber roller for spots or pits of damage, and replace it if necessary (the rubber roller cannot be repaired).
- Test with another roll of labels to determine if the issue improves.
5. Why does the thermal transfer ribbon keep snapping during printing?
Analysis of Issues
- The ribbon exhibits back-coating imperfections.
- The fracture surface of the ribbon is damaged.
- The printing temperature is excessively high.
- The pressure exerted by the printer head is too high.
Troubleshooting and Solutions
- Apply self-adhesive tape to the back coating of the ribbon and check if it easily peels off. Difficulty in removal indicates back coating imperfections.
- Inspect the fracture surface of the ribbon for nicks or burrs, and gently pull the ribbon to test its breakage resistance.
- Reduce the printing temperature to the lowest possible setting for sharper printing results.
- Adjust the printer pressure to minimize pressure from the printer head while ensuring crisp print quality.
6. What’s causing those black ink marks on the printed labels?
Analysis of Issues
- The ribbon isn’t fully dried.
- The printer exerts excessive pressure.
- The label is overly thick.
- Backfeed occurs in the printer during printing.
Troubleshooting and Solutions
- Spread out a portion of the ribbon on the platform and lightly press the ink layer with your hands to check for excessive stickiness.
- Decrease the pressure applied by the printer head.
- If the label is too thick, it will leave indentations. Adjust the printer pressure accordingly based on the label thickness.
- Abnormal printer settings during printing cause backfeed, resulting in friction marks.
7. Why do the labels move while printing, but the thermal transfer ribbon doesn’t move with them?
Analysis of Issues
- The ribbon’s back coating is coarse, and there’s an inadequate amount of back coating chemicals, resulting in considerable friction.
- The printer applies excessive pressure.
- The printer is configured in “thermal” mode.
Troubleshooting and solutions
- Apply self-adhesive tape to the ribbon’s back coating and check if it peels off easily. Difficulty in removal indicates insufficient back coating.
- Adjust the printer pressure to lessen the pressure exerted by the printer head while ensuring clear printing.
- Switch the printer’s “Printing Preferences” back to “Thermal Transfer Mode”.
8. What’s up with the “crackling” sound like sparks during printing?
Analysis of Issues
- The ribbon generates excessive static electricity.
- The printer lacks proper grounding.
Troubleshooting and solutions
- While printing, position the machine on a conductive surface if available. If not feasible, consider installing a static elimination device on the printer.
- Ensure the printer is properly grounded.
9. Why won’t the thermal transfer ribbon stay put on my printer? And why does it keep falling off after installation?
Analysis of Issues
- The ribbon paper core is distorted, likely due to compression.
- The ribbon paper core has large burrs and excessive paper scraps.
- The printer’s unwinding shaft is bent and not straight.
- Check if the flat spring mechanism malfunctions if the ribbon slips on the unwinding shaft.
Troubleshooting and solutions
- Examine the paper core for obvious deformities, such as becoming oval-shaped. If detected, return it.
- Check the paper core for any paper scraps or burrs. Clean them thoroughly and retry. If the issue persists, it may be due to deformation, warranting a return.
- Inspect the printer’s unwinding shaft for deformation or debris accumulation. If found, replace or clean the unwinding shaft accordingly.
- If the flat spring needs replacement, do so. If not, consider adding one or two labels to the inner wall if the inner diameter of the paper core is too large.

Hi, we are looking for a supplier for wax resin thermal transfer ribbons. We need custom on 1″ core notched at both ends, inkside in. Is this something you can produce for us?
Of course! Our sales team will be reaching out to you shortly. Please watch for emails ending in @sunavin.com.
Great guide! Well written, Steven.